What You’ll Accomplish in 60 Minutes
When I first launched Outworld Station, I stared at an empty station and an English-only UI for a solid three minutes. Hit B, didn’t know what to build. Built a solar panel, didn’t know how to wire it. Spent half an hour without mining a single rock.
This is the guide I needed that day. Follow these steps and you’ll have a self-running production line in 60 minutes.
After This Guide You'll Know How To
Navigate the English UI, set up your first power system, run a mining drill, and automate iron ore → iron plates. After that, you can start messing around on your own.
Phase 1: Getting Started (0-10 min)
Initial Station Setup
You start inside the Station Core. Don’t panic. Remember one key: B opens the build menu.
Your first three moves:
- Don’t build anything yet. First, drag your station closer to the nearest asteroid. Right-click and hold on the station to drag it. Get as close as possible — the closer you are, the less travel time for your first hour.
- Press B → Infrastructure tab → Build 2 Solar Panels
- Build 1 Battery next to the panels
Mistake I made: First time, I parked my station way too far from the asteroid. When I built the drill, the connection range wasn't enough. Had to drag the station twice. Lesson: get close first, worry about positioning later.
Your Power Setup
Nothing works without power. Your energy journey goes through three phases:
| Phase | What to Use | How Many |
|---|---|---|
| First 30 min | Solar Panels | 4-6 |
| 30 min - 3 hrs | Small Reactors | 1-2 |
| 3+ hrs | Fusion Reactor | 1 is enough |
Don’t try to skip solar and rush reactors. I tried. My production line kept stuttering, drills stopped, everything locked up. Solar isn’t permanent, but it buys you stability.
Phase 2: First Automation (10-25 min)
Mining! Mining!
Build a Mining Drill on the asteroid surface:
- B → Build Menu
- Mining tab → Mining Drill
- Mouse over the asteroid surface — green highlights show valid spots
- Place it
- Make sure it’s connected to your power grid
Once the drill runs: Ore accumulates in the drill’s internal storage. But it won’t come to you automatically — that’s the next step.
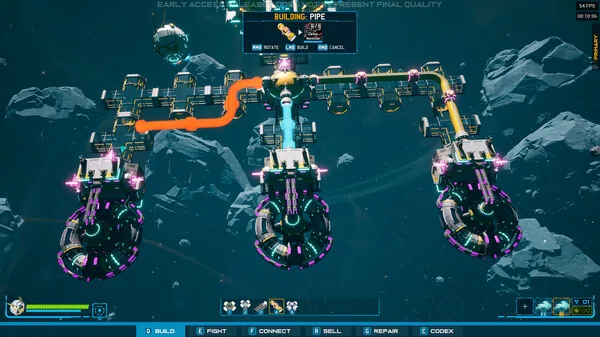
The Invisible Logistics (No Conveyor Belt? Here’s How)
This is where Outworld Station differs from Factorio — no conveyor belts, you use Inventory Pairing instead.
Plain English: You tell the drill “send ore to that storage container over there.” The game creates an invisible logistics channel. No belts, no drones, no space taken up.
How to do it:
- Left-click the Mining Drill
- Click the Inventory tab in the popup
- Under Output, there’s a Pair button — click it
- Mouse over your station and select a Storage Container
- Done. Ore will automatically flow to the container
How Logistics Works
This game uses demand-driven logistics — materials only move when the consumer needs them. No endless conveyor belts, no jams. The tradeoff is you can't see the pipes, so debugging takes some getting used to.
Your First Processing Line
Ore is coming in. Now turn it into something useful:
- Build a Smelter (Production tab)
- Click the smelter → Inventory tab
- Input: click Pair → select the ore storage container
- Output: click Pair → select an empty Storage Container
- The smelter starts automatically: Ore → Iron Ingot
Now build an Assembler. Pair its input to the ingot container and output to a new container. It’ll turn ingots into Iron Plates.
Congratulations — you just built your first automated production chain: Mining → Smelting → Assembly → Storage.
Phase 3: Expansion Basics (25-45 min)
Tech Tree Priority
Press T for the Tech Tree. Here’s what to research first:
| Priority | Tech | What It Does |
|---|---|---|
| Logistics I | +50% logistics throughput. The most important early tech. | |
| Power Storage II | Double battery capacity. No more night-time brownouts. | |
| Mining Efficiency | +30% mining speed | |
| Advanced Smelting | Unlocks alloy crafting. Entry to tier 2 materials. |
Don't do what I did: I rushed Advanced Smelting first, then realized alloys needed materials I didn't have a stable line for. Do Logistics I and Mining Efficiency first. Get your base running smooth before chasing fancy tech.
Expanding the Station
Once you have 50+ iron plates and 20+ circuit boards:
- Build an Expansion Hub
- Choose to expand toward the asteroid (closer to resources = better)
- New modules can house: research labs, extra storage, defense turrets
Build Your First Ship
Once your production line is stable, it’s time to explore:
- Research Shipyard I in the tech tree
- Build a Shipyard
- Construct a Scout Ship
- Send it to explore nearby planets — you’ll find new resources and wormhole entrances
Phase 4: Three Mistakes You’ll Make (45-60 min)
I Made All Three. Don't Be Like Me.
- Starting a second station too early. Your first station isn't fully automated yet and you're already building on another planet? Both stations will fail. Get one station self-sufficient first.
- Zero defenses. First wormhole invasion hits around minute 30. If you don't have 2-3 turrets by then, your station core gets wrecked. Lost my first run this way.
- Not upgrading storage. Starting storage is 100 units. Your drill fills it fast, then stops. Smelter starves. Whole line locks up. Upgrade to Storage II ASAP.
8 Questions New Players Actually Ask
Q: The UI is all English, any help?
Learn four key terms: B = Build menu, T = Tech Tree, Inventory = storage panel on any building, Pair = link outputs to inputs. Those four got me through the first hour.
Q: Are solar panels enough?
For starting out, yes. But after 30 minutes you’ll need more. Research Reactor Tech I and build a Small Reactor.
Q: Teammates building random stuff in co-op?
The host can manage player permissions. No explicit permission panel exists, but kick options work. Best advice: agree on roles before starting. Nothing awkward like one guy mining while another builds a starship.
Q: What does the Battery do?
Stores power. Solar panels don’t generate at night (there IS a day/night cycle, shorter than Earth’s). Batteries store daytime energy for nighttime use. Build 1-2 early on.
Q: Why won’t my Smelter work?
Three checks: ① Is it powered? ② Is Input paired to an ore source? ③ Is Output paired to a container? Nine times out of ten it’s one of these three. I’ve failed each one at least once.
Q: Can’t find a building in the B menu?
The build menu has category tabs (Infrastructure / Mining / Production / Defense / Tech). Your building might be in a different tab. Also, some buildings need tech research to appear.
Q: When does the first invasion happen?
Around minute 30. Small bugs, not too strong. But with zero defenses you’re toast. Place 2-3 turrets before the 30-minute mark.
Q: How much storage do I need?
3-4 Storage Containers early on. One container per material type — don’t mix them. Mixed storage makes inventory management a nightmare.
Checklist before you go exploring on your own:
- 4-6 Solar Panels, stable power
- At least 1 Mining Drill running
- Iron ore → Ingot → Plate chain established
- 2-3 Turrets in place
- First Scout Ship launched
- Logistics I tech unlocked
📖 What's Next
Automation Deep Dive
Inventory Pairing, wormhole supply chains, bottleneck hunting. Once you've got your first production line, master the invisible logistics that run your station.
Power Management
Solar panels to fusion reactors. Don't let your station go dark. Covers battery ratios, grid zoning, and the upgrade path from solar to fusion.