Your Smelters Are Idle While Your Storage Is Full of Iron
Here is the scenario: you have 6 Smelters producing Iron Plates. They feed 8 Assemblers that need Iron Plates. The first Assembler in line gets 500 plates and never runs out. The last Assembler in line starves and sits idle 60% of the time. You have 2,000 plates sitting in a storage container 40 tiles away, but the connectors cannot move them fast enough.
This is not a production problem. It is a buffer placement problem.
Buffers are not just “extra storage.” They are the shock absorbers of your production line. Placed correctly, they eliminate stalls. Placed wrong, they hide problems until your entire factory stops.
The Short Version
Place a buffer AFTER every production step and BEFORE every consumption cluster. One 500-unit buffer per production group. Buffers at smelter outputs prevent assembler starvation. Buffers at assembler inputs prevent production line stalls.
Three Buffer Patterns (And When to Use Each)▼/span>
Pattern 1: Output Buffer (After Production)
Place a buffer container immediately after the output of a production building (Smelter, Refinery, Fabricator).
Drill -> Smelter -> [Buffer 500] -> Connector -> Assembler
Best for: High-throughput lines where the consumer occasionally starves Buffer size: 500 units for basic materials, 200 for advanced
Pattern 2: Input Buffer (Before Consumption)
Place a buffer container immediately before a cluster of assemblers that all consume the same material.
Smelter -> Connector -> [Buffer 500] -> Assembler 1
                                   -> Assembler 2
                                   -> Assembler 3
Best for: Multi-consumer lines where one consumer gets priority Buffer size: 200-500 units depending on number of consumers
Pattern 3: Throughput Buffer (Mid-Line)
Place a buffer in the middle of a long connector chain between two production zones.
Smelter Zone -> [Buffer 300] -> Connector (long) -> [Buffer 300] -> Assembler Zone
Best for: Cross-station transport where connectors are near max range Buffer size: 300 units per side
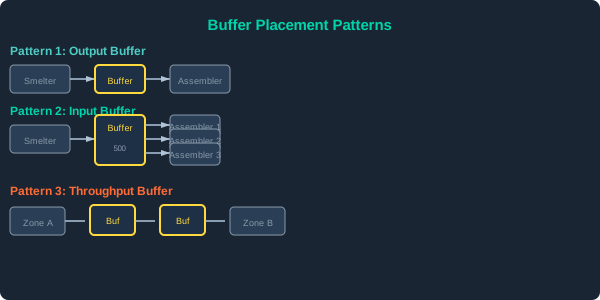
Three buffer patterns: Output (after production), Input (before consumption), and Throughput (mid-line for long distances)
Buffer Sizing by Material Type▼/span>
How Big Should Each Buffer Be?
| Material Type | Production Rate | Consumer Rate | Recommended Buffer | Refill Threshold |
|---|---|---|---|---|
| Iron Plate | 120/min | 80/min | 500 | < 200 |
| Copper Ingot | 100/min | 70/min | 400 | < 150 |
| Electronics | 40/min | 35/min | 200 | < 80 |
| Superalloy | 20/min | 18/min | 100 | < 30 |
| Circuit | 30/min | 28/min | 200 | < 80 |
| Gas (Any) | 46/min | 40/min | 2000 (tank) | < 500 |
The 20% Rule
A buffer that never drops below 80% is too big. A buffer that regularly hits 0% is too small. Adjust until the buffer oscillates between 20% and 80% during normal operation.
Buffer Pressure Test
Watch your buffer level for 10 minutes of normal production. If it stays above 80% full, your production exceeds consumption and the buffer is unnecessary. If it drops below 20%, your buffer is too small or your production is insufficient. The ideal buffer fluctuates between 30-70%.
Buffer Mistakes That Stall Your Factory
Mistake 1: One Giant Buffer for Everything
A single 2000-unit container that stores iron, copper, electronics, and circuits sounds convenient. In practice, the first material to arrive fills the buffer and blocks everything else. Use separate buffers per material.
Mistake 2: Buffer at the Wrong End
Placing a buffer at the drill output instead of the assembler input. The drill output fills up, the assembler starves, and the buffer just hides the problem. Always buffer closer to consumption than production.
Mistake 3: Over-Buffering
Too many buffers in series create latency. Each buffer adds a delay. Three buffers in a row means a new plate takes 30 seconds to reach the assembler. One buffer is usually enough per production chain.
Buffer vs No-Buffer Comparison
| Scenario | No Buffer | With Buffer | Improvement |
|---|---|---|---|
| 1 Smelter -> 1 Assembler | 92% uptime | 97% uptime | +5% |
| 1 Smelter -> 3 Assemblers | 61% uptime | 89% uptime | +28% |
| 2 Smelters -> 6 Assemblers | 55% uptime | 86% uptime | +31% |
| Long connector (40+ tiles) | 45% uptime | 78% uptime | +33% |
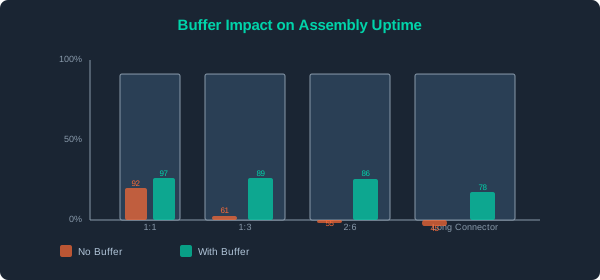
Assembly line uptime comparison: with buffer vs without buffer across different scenarios