Your Station Is Bigger Than Connector Range Now
You have 40 buildings. Iron drills on the east side. Assemblers on the west. Smelters in the center. Your connectors cannot reach across the station anymore. Every new module you add makes the sprawl worse.
Cargo Drones fix this. They fly over everything, ignore range limits, and deliver materials directly to any building that requests them. But the in-game tutorial assumes you already know how to set them up. Most players build a drone station, assign one drone, and wonder why nothing moves.
The Short Version
Build a Drone Station, craft 2-4 Drones, set Request zones at your assemblers and Supply zones at your storage. Drones auto-balance supply and demand within their range. One station covers roughly half a large station sector.
How Cargo Drones Work (The Mechanic)▼/span>
Drone Station Basics
A Cargo Drone Station is the hub. It has three settings:
| Setting | What It Does | Default |
|---|---|---|
| Supply Zone | Buildings in this zone provide items for pickup | None |
| Request Zone | Buildings in this zone request items for delivery | None |
| Drone Count | How many drones this station controls | 1 |
| Battery Charge Rate | How fast docked drones recharge | Slow |
How a Delivery Happens
- An assembler in Request Zone runs low on iron plates
- The Drone Station detects the shortage
- A drone flies to the nearest building in Supply Zone that has iron plates
- The drone picks up plates and delivers them to the assembler
- The drone returns to the station to recharge
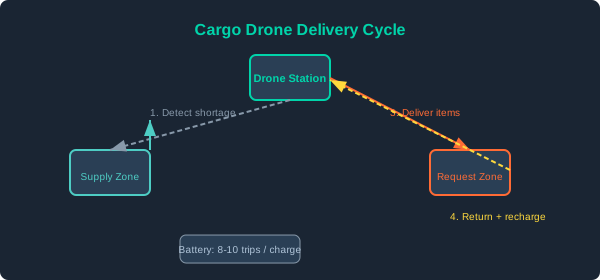
Cargo drone delivery cycle: Station -> Pickup at Supply -> Deliver to Request -> Return to recharge
Critical Detail: Battery
Drones have a battery that depletes with each flight. If a drone runs out of battery mid-flight, it drops its cargo and falls. The cargo is lost. The drone must be rebuilt.
Battery tips:
- Short routes within one sector: drone makes 8-10 trips before recharging
- Cross-sector routes: drone makes 3-4 trips before recharging
- Keep drone stations central to both supply and demand
Step-by-Step Setup (First Drone Network)▼/span>
Step 1: Place the Drone Station
Build it centrally between your main storage and your production line. A good rule: if you can draw a circle with 20-tile radius that covers both supply and demand, you are in the right spot.
Step 2: Craft Drones
Each drone costs:
- 20 Iron Plates
- 5 Copper Wire
- 2 Electronics
- 1 Small Battery
Start with 2 drones. Add more when you see idle assemblers.
Step 3: Set Supply Zone
Click on the Drone Station and open the zone editor. Place the Supply Zone marker over your main storage area. This tells drones: “Items can be taken from here.”
Step 4: Set Request Zone
Place the Request Zone marker over your production area. This tells drones: “Items are needed here.”
Step 5: Assign Drones
Set Drone Count to 2. The drones launch automatically and start scanning for work.
Step 6: Verify
Check the Drone Station interface. You should see:
- “Supply Zone: 4 buildings” (storage containers, buffer chests)
- “Request Zone: 6 buildings” (assemblers, fabricators)
- “Drones Active: 2/2”
First Test
After setup, manually put 100 iron plates in storage. If your assembler gets them within 30 seconds, the network is working. If not, check zone overlap and battery levels.
Advanced: Multiple Drone Stations and Sector Coverage▼/span>
When One Station Is Not Enough
A single Drone Station covers roughly 30-40 tile radius. If your station spans 100+ tiles, you need multiple stations. The setup:
| Station | Covers | Drones | Supply Source | Request Targets |
|---|---|---|---|---|
| East Hub | Mining + Smelting | 3 | Miner buffers | Smelter inputs |
| Center Hub | Main storage + Assembly | 4 | Smelter outputs | Assembler inputs |
| West Hub | Advanced production | 3 | Assembly outputs | Refinery + Fabricator |
Station Handoff
Stations do NOT talk to each other directly. Items move from East to Center either via connector links between storage areas, or by a single drone that moves items from East storage to Center storage. Use a connector line between sector storage hubs as the backbone.
Drone + Connector Hybrid
Use connectors for short, high-volume links (smelter to storage, 5 tiles). Use drones for long, low-volume links (storage to distant assembler, 40 tiles). This hybrid approach uses fewer drones and keeps your high-throughput lines fast.
Drone Count Calculator
| Station Size | Building Count | Recommended Drones | Notes |
|---|---|---|---|
| Small (early) | 10-20 | 2-3 | One station covers everything |
| Medium (mid) | 30-60 | 6-10 | Two stations, sector-split |
| Large (late) | 80+ | 15-25 | Three+ stations, hub-and-spoke |
Common Problems and Fixes
| Symptom | Cause | Fix |
|---|---|---|
| Drones idle but assemblers starving | Supply Zone missing storage | Add storage containers to Supply Zone |
| Drones die mid-flight | Battery too low for route distance | Add recharge station mid-route |
| One assembler hoards all items | Request Zone priority not set | Set priority on individual assemblers |
| Drones ignore a building | Building not in Request Zone | Expand Request Zone radius |
When NOT to Use Drones
Cargo Drones are slower than connectors. Do not use drones for:
- High-throughput smelting lines (use direct connector pairs)
- Short distances under 10 tiles (connectors are faster and free)
- Items you need instantly (drones have travel time)
Use drones for:
- Cross-sector material transport
- Low-volume specialty items (electronics, circuits)
- Items going to multiple consumers from one source
The Bottom Line
Cargo Drones solve the mid-game sprawl problem. Use them when your station exceeds connector range. Start with 2 drones and one station. Expand only when you see assemblers waiting for materials.