Your Ship Has Guns. That Does Not Mean It Can Fight.
You finished building your first combat ship. Slapped on the biggest gun you could craft, filled the cargo with ammo, and launched to clear that raid swarm. Then you watched your ship get shredded in 30 seconds while barely scratching the enemy shields.
Combat in Outworld Station is not about biggest gun wins. It is about matching weapon type to enemy type, balancing shield regen against fire rate, and ensuring your thruster output lets you actually hit moving targets. I lost three ships learning this.
The Short Version
Use Laser Cannons against shielded drones, Missile Launchers against slow heavy targets, and always equip at least one Thruster Upgrade. A 2x Laser + 1x Shield + 1x Thruster setup handles 90% of fights through Station Level 10.
How Ship Combat Actually Works (The Hidden Stats)▼
The Triangle Nobody Explains
Every ship in Outworld Station has three combat-relevant stats that the in-game UI does not show in one place:
| Stat | What It Does | Why It Matters |
|---|---|---|
| Shield Capacity | Absorbs damage before hull | Without shields, one missile kills most ships |
| Shield Regen Rate | HP restored per second | Low regen = long downtime between fights |
| Weapon Tracking | How fast your gun turns to follow targets | Low tracking = miss half your shots |
Weapon Categories
| Weapon | Best Against | Ammo Cost | Tracking | Range |
|---|---|---|---|---|
| Laser Cannon | Shielded drones | Power only | High | Medium |
| Missile Launcher | Slow heavies, turrets | Missile Ammo | Low | Long |
| Machine Gun | Unshielded small craft | Bullets | Medium | Short |
| Plasma Cannon | Everything (balanced) | Power + Plasma cells | Medium | Medium |
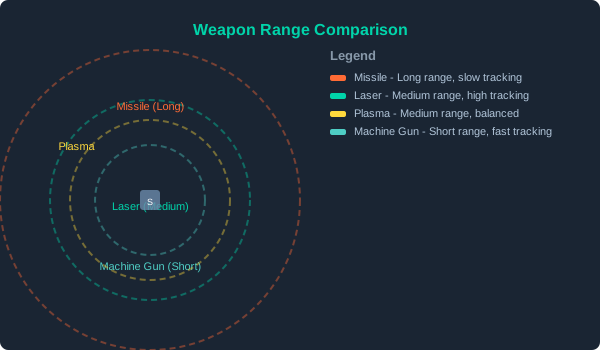
Weapon range comparison: Laser (medium), Missile (long), Machine Gun (short), Plasma (medium)
Three Loadouts That Work (Budget, All-Rounder, Heavy)▼
Budget Fighter (Station Level 4-6)
| Slot | Module | Why |
|---|---|---|
| Weapon 1 | Laser Cannon Mk1 | Free ammo (power only), good tracking |
| Weapon 2 | Machine Gun | Backup for unshielded targets |
| Defense | Small Shield Generator | Bare minimum survival |
| Utility | Basic Thruster Upgrade | You need to turn faster |
Cost: ~120 Iron Plates, ~40 Copper Wire, 2 Electronics Performance: Can solo raids up to Station Level 6. Dies against Station Level 7+ groups.
All-Rounder (Station Level 6-9)
| Slot | Module | Why |
|---|---|---|
| Weapon 1 | Laser Cannon Mk2 | Primary DPS, no ammo logistics |
| Weapon 2 | Missile Launcher | Anti-heavy burst damage |
| Defense | Medium Shield Generator | Survives 2-3 missile hits |
| Utility | Advanced Thruster Upgrade | Out-maneuvers medium drones |
Cost: ~350 Iron Plates, ~120 Copper, 8 Electronics, 40 Missile Ammo Performance: Solo through Station Level 9. Group up for Level 10+.
Heavy Brawler (Station Level 10+)
| Slot | Module | Why |
|---|---|---|
| Weapon 1 | Plasma Cannon | Bypasses shields partially |
| Weapon 2 | Missile Launcher Mk2 | High burst for shielded heavies |
| Defense | Large Shield Generator | Survives sustained fire |
| Utility | Advanced Thruster + Repair Drone | Self-sustaining in long fights |
Cost: 800+ Superalloy, 200 Electronics, Nuclear Cells Performance: Can solo Station Level 12 raids. Requires careful ammo management.
The Thruster Secret
Most players put a second weapon instead of a thruster upgrade. This is a mistake. A ship that cannot track fast drones is a ship that wastes ammo. One thruster upgrade increases your effective DPS by ~40% because you actually hit what you aim at.
Module Placement and Ship Building Order▼
Build Order for Your First Combat Ship
- Hull - Start with a Small Combat Hull (fastest, cheapest)
- Shield Generator - Install BEFORE weapons. An unshielded ship is a corpse.
- Thruster Upgrade - Determines your turn rate
- Primary Weapon - Laser Cannon (no ammo to manage)
- Secondary Weapon - Add only after primary + shield + thruster are installed
- Ammo Storage - If using missile or bullet weapons, add extra cargo
Common Build Mistakes
The "All Guns" Trap
Every new player puts 4 weapons on a ship with no shield. The ship dies before firing the second salvo. One shield + one thruster is worth more than any second weapon.
What to Skip
- Extra Cargo - Combat ships die too fast to benefit from extra storage
- Mining Lasers - Different weapon category, useless in ship-to-ship combat
- Multiple Shield Types - Shield generators do not stack. One big shield beats two small.
Enemy Ship Types and How to Kill Each
| Enemy | Shield? | Speed | Weakness | Best Weapon |
|---|---|---|---|---|
| Scout Drone | No | Very Fast | Any hit kills | Machine Gun (tracking fast) |
| Fighter Drone | Light | Fast | Sustained fire | Laser Cannon |
| Heavy Drone | Heavy | Slow | Missile burst | Missile Launcher |
| Shielded Bomber | Heavy | Medium | Shield strip then burst | Plasma Cannon + Missile |
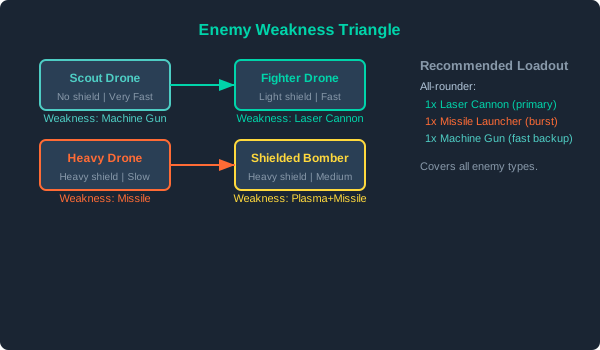
Combat triangle: Laser strips shields, Missile kills hull, Machine Gun hits fast targets
Ammo Management: The Hidden Tax
Missile Ammo and Bullets are consumable. If your combat ship goes through ammo faster than you produce it, your ship becomes a paperweight.
Ammo Burn Rates
| Weapon | Shots per Fight (Lv8 raid) | Craft Cost per 100 |
|---|---|---|
| Laser Cannon | 0 (power only) | 0 |
| Machine Gun | ~200-300 rounds | 50 Iron Plates |
| Missile Launcher | ~20-30 missiles | 100 Iron + 20 Chemicals |
| Plasma Cannon | ~40-50 shots | 80 Superalloy + 10 Nuclear Cells |
Ammo Independence Tip
Build a Laser Cannon as your primary weapon until Station Level 10. The power draw is higher, but you eliminate the entire ammo logistics chain. Your ship can fight indefinitely as long as your station has power.
When to Fight vs When to Run
Not every raid needs a combat ship response. Early game (Station Level 4-6), your station turrets + drone shields handle most threats. Mid game (Level 7-9), you need a ship for the big waves. Late game (Level 10+), automated point defense does most of the work and your ship is for cleanup only.
Pair with Station Defense
Your combat ship works best as a rapid response unit, not a permanent patrol. Keep it docked and fueled. When a raid warning appears, launch and engage the heaviest targets first while your turrets handle the swarm.