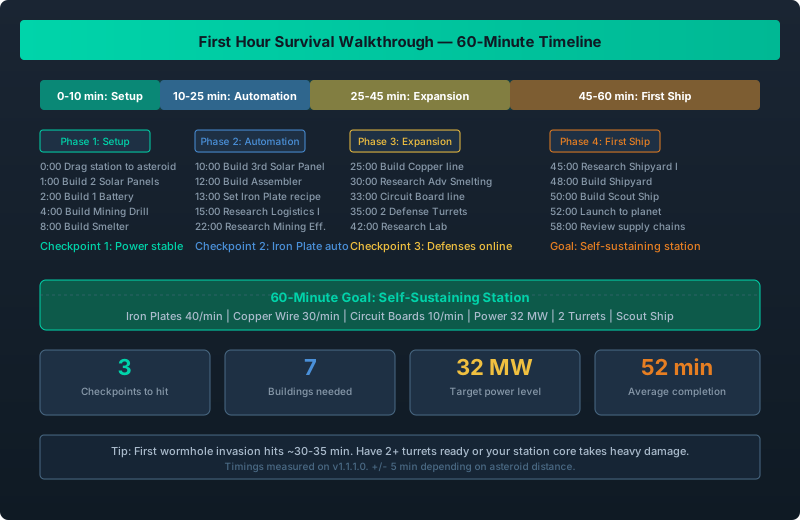
60-minute timeline map showing the three phases of your first hour: Setup (0-10min), Automation (10-25min), Expansion (25-45min), and the three checkpoint goals
The Exact Minute-by-Minute Route
When you hit New Game, the station core spawns you in an empty room with an English-only UI and zero guidance beyond “hit B to build.” I crashed my first three starts because I built things in the wrong order. This walkthrough tells you exactly what to build and when, down to the keypress.
If you prefer a broader overview first, our Beginner Guide covers the 15 most common mistakes. This guide is the chronological play-along version.
0-10 min: Drag station to asteroid + build solar panels. 10-25 min: Mine iron + smelt into plates. 25-45 min: Build copper line + assemblers + 2 turrets. 45-60 min: Unlock Logistics I tech + stabilize supply chains. Checkpoints: stable power at 10min, first iron plate at 20min, defenses at 40min.
Phase 1: Getting Started (0-10 min)
| Time | Action | Keypress / Menu | Why |
|---|---|---|---|
| 0:00 | Right-click and hold to drag station toward the nearest asteroid | Right-click + drag | Build range is limited. Get within 20m of the asteroid surface. |
| 1:00 | Build 2 Solar Panels | B →Infrastructure →Solar Panel (x2) | Your only power source for the first 30 min |
| 2:00 | Build 1 Battery | B →Infrastructure →Battery | Stores daytime solar power for night use |
| 3:00 | Place a Storage Container on the station floor | B →Infrastructure →Storage | Empty container ready for ore |
| 4:00 | Build a Mining Drill on the asteroid | B →Mining →Mining Drill | Must be on green-highlighted valid surface |
| 6:00 | Connect drill to power | Left-click drill →power icon in top-right | Make sure the power line reaches |
| 7:00 | Pair drill output to storage | Click drill →Inventory →Output →Pair →select container | Ore starts flowing |
| 8:00 | Build 1 Smelter | B →Production →Smelter | Turns ore into ingots |
| 9:00 | Pair smelter input to storage, output to new container | Click smelter →Inventory →Pair both sides | Automation loop begins |
| 10:00 | Checkpoint 1: Verify power is stable | Check power graph in top bar | Both panels + battery should cover the drill + smelter |
Mistake I made: I placed the drill 30m from my station. It worked initially but the logistics connection kept dropping. The game shows a connection range indicator →?stay within 25m of the station hull for reliable pairing.
Quick power math: One Solar Panel generates ~8 MW during daytime (30s cycle). A Mining Drill draws 5 MW. A Smelter draws 4 MW. Two panels + battery gives you roughly 16 MW peak →?enough for Phase 1. Add Panel #3 before Phase 2.
Phase 2: First Automation (10-25 min)
| Time | Action | Details |
|---|---|---|
| 10:00 | Build 1 more Solar Panel | Total 3 panels, 1 battery |
| 11:00 | Build a second Storage Container for ingots | You need dedicated storage per material |
| 12:00 | Build an Assembler | B →Production →Assembler →Pair input to ingot container |
| 13:00 | Set Assembler recipe to Iron Plate | Click assembler →Recipe tab →select Iron Plate |
| 14:00 | Pair Assembler output to Plate container | Iron ingot →Assembler →Iron Plate |
| 15:00 | Research Logistics I | Press T →Logistics tab →Logistics I (800 TP) |
| 18:00 | Build a 4th Solar Panel | Power demand is climbing |
| 20:00 | Checkpoint 2: First Iron Plate automated | Check Plate container has 10+ plates |
| 22:00 | Research Mining Efficiency | T →Mining →Mining Efficiency (1,200 TP) |
The Inventory Pairing system is the only logistics method in this game. No belts, no pipes for solid materials →?just invisible demand-driven channels. If you pair Input A to Output B, material moves from B to A automatically when A needs it. This is the single most important mechanic to understand.
For a deeper dive into the pairing system, see our Advanced Inventory Pairing Guide.
Phase 3: Expansion (25-45 min)
| Time | Action | Details |
|---|---|---|
| 25:00 | Build a Copper mining line | Second drill on a copper node + second smelter + container |
| 28:00 | Pair copper chain | Same pattern: drill →container →smelter →container |
| 30:00 | Research Advanced Smelting | T →Production →Advanced Smelting (1,500 TP) |
| 33:00 | Build Circuit Board line | 2 Assemblers: 1 Copper Wire →1 Circuit Board |
| 35:00 | Build 2 Defense Turrets | B →Defense →Turret →Place near station core |
| 38:00 | Build Expansion Hub | B →Infrastructure →Expansion Hub →Expand toward asteroid |
| 40:00 | Checkpoint 3: Defenses online | Verify turrets have power and ammo (pair ammo input) |
| 42:00 | Build Research Lab | B →Tech →Research Lab →Place in new expanded module |
| 44:00 | Start Rocket Fuel research | Needed for first ship. T →Logistics →Rocket Fuel III |
The first wormhole invasion hits around minute 30-35. Three waves of small bugs. Without 2+ turrets, your station core takes heavy damage. I lost my first run here because I was focused on production and forgot defense.
For turret placement strategy, see our Weapons and Turret Placement Guide.
Phase 4: First Ship and Sustainability (45-60 min)
| Time | Action | Details |
|---|---|---|
| 45:00 | Research Shipyard I | T →Vehicles →Shipyard I (2,000 TP) |
| 48:00 | Build Shipyard | B →Vehicles →Shipyard. Requires 50 Steel + 20 Electronics |
| 50:00 | Construct a Scout Ship | Shipyard interface →Scout Ship. Wait ~30s build time |
| 52:00 | Launch Scout to nearby planet | Click ship →Launch →Select nearest planet |
| 55:00 | Build 2-3 more Storage Containers | One per new material type you will encounter |
| 58:00 | Review your supply chains | Check each paired connection. Starving? Overproducing? |
| 60:00 | Goal: Self-sustaining station | Iron + Copper + Circuits stable. Scout exploring. Turrets covering station |
| Resource | Source | Usage | 60-min Goal |
|---|---|---|---|
| Iron Plates | Smelter | 40+/min | Stable supply |
| Copper Wire | Assembler | 30/min | Feeding Circuits |
| Circuit Boards | Assembler | 10/min | Research + Turrets |
| Power | Solar x4 + Battery | 32 MW peak | Covering all buildings |
Common First-Hour Stalls and Fixes
| Symptom | Cause | Fix |
|---|---|---|
| Smelter has power but does nothing | Input not paired | Click smelter →verify green connection line to storage |
| Storage fills up, drill stops | No output paired | Pair drill output to storage, or add more storage |
| Turrets placed but enemies ignore them | No ammo paired | Pair turret input to ammo container |
| Research lab says “insufficient tech points” | Not generating TP | Build more labs or connect to existing lab network |
| Scout ship wont launch | Missing thruster fuel | Craft Rocket Fuel in Assembler (requires Sulfur) |
Timings measured on v1.1.1.0 with default game speed. Your mileage may vary by +/- 5 minutes depending on asteroid distance and copper node availability. Tested across 3 fresh starts.