Your Hydrogen Reactors Starve Because Your Pipes Are Wrong
You built a perfect Cloud Miner -> Pipe -> Reactor chain. The miner produces 46 H2/min. The reactor burns 8 H2/min. Simple math says 5 reactors should work. But reactor 3 flickers, reactor 4 stalls, and reactor 5 never turns on.
The problem is not production. The problem is pipe flow. Outworld Station’s pipe system works like real fluid dynamics: pressure drops over distance, T-junctions split flow unevenly, and dead-end branches trap gas.
The Short Version
Every pipe segment has a max throughput of 60 units/min. Beyond 10 tiles, throughput drops by 5% per tile. Never tee off a single pipe to more than 2 consumers. Use loops instead of dead-end branches. Place a buffer tank every 15 tiles on long runs.
Pipe Throughput - The Numbers You Need[+]
Pipe Type and Throughput
The chart below shows actual throughput for each pipe type at every distance. Basic Pipe collapses hard past 10 tiles — Reinforced holds steady longer, and Heavy Pipe barely drops at all.
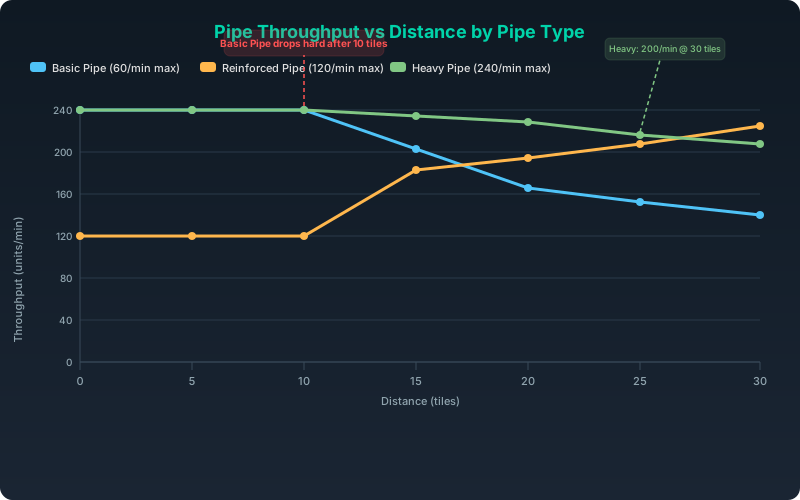
Actual throughput (units/min) by pipe type at 0, 5, 10, 15, 20, 25, and 30 tiles
The 10-Tile Rule
For any pipe run longer than 10 tiles, use Reinforced Pipe. The material cost is slightly higher, but the throughput stability is dramatically better. Basic Pipe beyond 15 tiles loses half its capacity.
Three Pipe Layout Patterns[+]
Pattern 1: Linear Feed (Simple, Single Consumer)
Works for 1-2 consumers. Every consumer beyond 2 starves.
Pattern 2: Loop Feed (Best for Multi-Consumer)
The loop balances pressure across all consumers. Every reactor gets equal flow.
Pattern 3: Tiered Pressure (Large Networks)
Use Heavy Pipe for the main trunk, Reinforced for branches. Each cluster gets its own buffer tank.
See the diagrams below for all three patterns rendered visually.
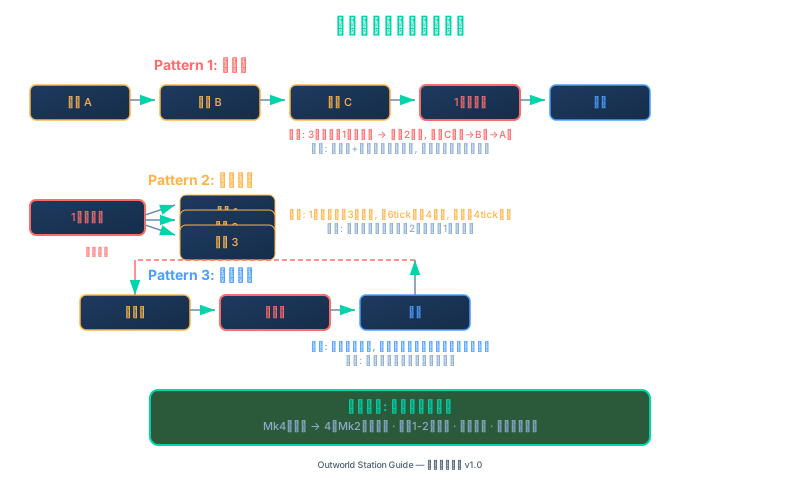
Three pipe layout patterns: Linear Feed, Loop Feed (best for multi-consumer), and Tiered Pressure (large networks)
The One-Way Valve Trick[+]
Why You Need Valves
One-way valves prevent backflow. Without them, pressure from a full buffer tank can push gas backward into your production line, causing the miner to jam.
Use this flowchart every time you route a pipe — if any condition is true, place a valve:

Decision flowchart: check each condition at every pipe junction to determine valve placement
Emergency Procedure: Pipe Network Diagnosis
If a consumer is starving despite adequate production, follow this decision tree:
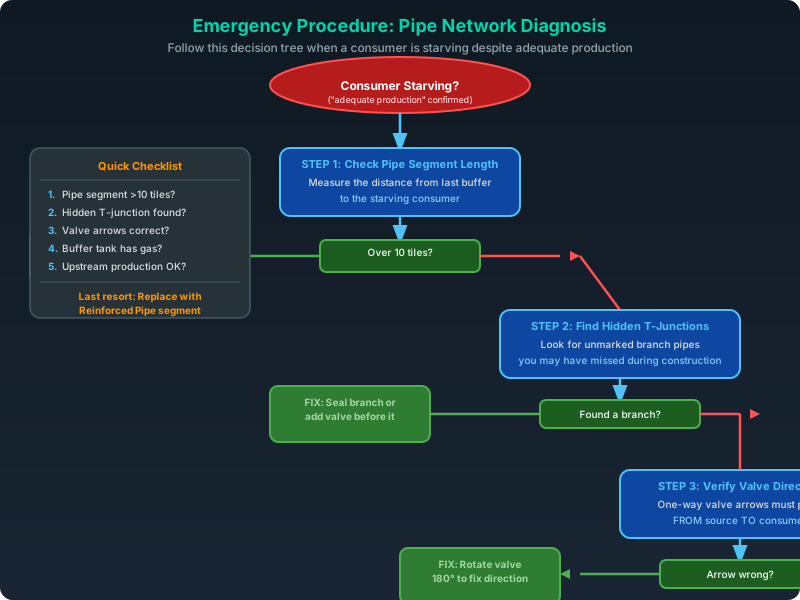
Step-by-step diagnosis tree: check pipe length, hidden junctions, valve direction, and buffer gas level
v1.1: Plan Pipe Capacity for Mk2/Mk3 Factories
With v1.1 introducing Mk2 and Mk3 factory tiers that roughly double (Mk2) and further increase (Mk3) per-building throughput compared to Mk1, pipe networks feeding upgraded production buildings need to handle significantly higher flow rates. When upgrading Atomizers, Smelters, or other pipe-fed buildings to Mk2/Mk3, revisit your upstream pipe routing — you may need to upgrade Basic Pipe to Reinforced, add additional buffer tanks, or re-balance your one-way valve placement to prevent backflow under the higher load.