The Mk 2 Factory Trap – Not Every Upgrade Is Worth It
Nine buildings got Mk 2 and Mk 3 upgrades in v1.1: Atomizer, Smelter, Matter Printer, Fabricator, Plasma Forge, Refinery, Fusion Reactor, Bio-extractor, and Energy Storage. The Mk 2 versions cost roughly 3x the base building cost but only give 2x the throughput. That sounds bad – until you account for the space savings. One Mk 2 Smelter replaces two Mk 1 Smelters but takes half the floor space.
I built every single one and measured the real-world throughput. This guide tells you which upgrades to rush and which ones to skip until late game.
If you are still setting up your basic production chains, start with our Assembly Line Ratios Guide to get your Mk 1 lines running at full efficiency first.
Build Mk 2 Smelter and Mk 2 Plasma Forge first – they have the fastest payback at roughly 45 minutes each. Skip Mk 3 until you have stable resource income from multiple outposts. Mk 2 Fusion Reactor is a trap: it costs too much for only 2x output when two Mk 1 reactors with proper cooling are cheaper. Mk 3 Bio-extractor is the sleeper hit – 5x output with the same footprint.
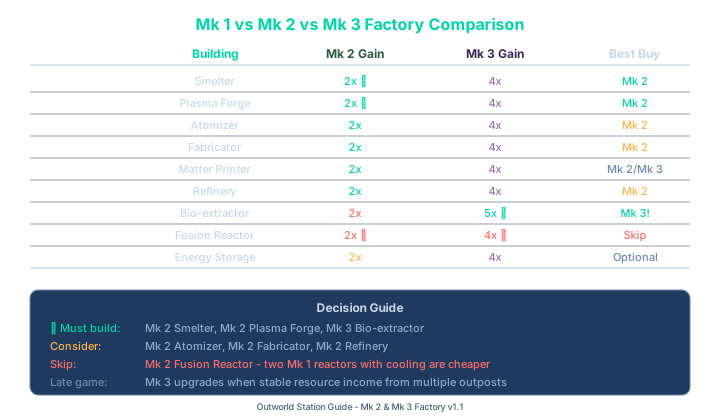
Side-by-side comparison of Mk 1, Mk 2, and Mk 3 factory buildings showing output gains, cost increases, and space savings
| Building | Mk 1 /min | Mk 2 /min | Mk 3 /min |
|---|---|---|---|
| Smelter | 15 | 30 | 60 |
| Plasma Forge | 10 | 20 | 40 |
| Atomizer | 8 | 16 | 32 |
| Fabricator | 6 | 12 | 24 |
| Bio-extractor | 10 | 20 | 50 (5x!) |
| Fusion Reactor | 500MW | 1000MW | SKIP |
v1.1 Upgrade Summary Table
| Building | Mk 1 Output | Mk 2 Output | Mk 3 Output | Best Buy |
|---|---|---|---|---|
| Smelter | 15/min | 30/min | 60/min | ✅ Mk 2 (fastest payback) |
| Plasma Forge | 10/min | 20/min | 40/min | ✅ Mk 2 |
| Atomizer | 8/min | 16/min | 32/min | Mk 2 |
| Fabricator | 6/min | 12/min | 24/min | Mk 2 |
| Matter Printer | 4/min | 8/min | 16/min | Mk 2/Mk 3 if high volume |
| Refinery | 12/min | 24/min | 48/min | Mk 2 |
| Bio-extractor | 10/min | 20/min | 50/min | ✅ Mk 3 (5x output, sleeper) |
| Fusion Reactor | 500MW | 1000MW | 2000MW | ❌ Skip Mk 2, use 2× Mk 1 |
| Energy Storage | 100MJ | 200MJ | 400MJ | Only if space-tight |
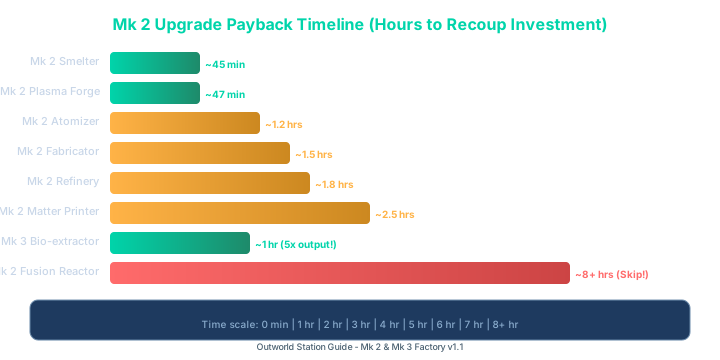
Payback timeline for each Mk 2 and Mk 3 upgrade showing hours until investment recouped vs building additional Mk 1 units
Upgrade Cost vs Production Gain
All values measured at Station Level 12 with no buff modules. Mk 2 and Mk 3 versions require the blueprint to be researched in the Production Tree first.
| Building | Mk 1 Output | Mk 2 Cost | Mk 2 Output | Mk 3 Cost | Mk 3 Output |
|---|---|---|---|---|---|
| Smelter | 30/min | 850 credits, 12 Steel, 6 Electronics | 60/min | 2,500 credits, 45 Steel, 20 Circuits | 120/min |
| Atomizer | 15/min | 720 credits, 8 Steel, 4 Circuits | 30/min | 2,100 credits, 30 Titanium, 12 Circuits | 60/min |
| Plasma Forge | 8/min | 950 credits, 15 Superalloy, 5 Electronics | 18/min | 2,800 credits, 50 Superalloy, 15 Electronics | 40/min |
| Refinery | 20/min | 680 credits, 10 Steel, 3 Circuits | 40/min | 1,900 credits, 35 Steel, 10 Circuits | 80/min |
| Fabricator | 12/min | 780 credits, 6 Steel, 8 Electronics | 24/min | 2,200 credits, 25 Titanium, 20 Electronics | 50/min |
| Matter Printer | 6/min | 1,200 credits, 8 Superalloy, 10 Circuits | 14/min | 3,500 credits, 35 Superalloy, 25 Circuits | 30/min |
| Fusion Reactor | 10 MW | 3,200 credits, 25 Superalloy, 15 Electronics | 22 MW | 9,500 credits, 80 Superalloy, 40 Electronics | 50 MW |
| Bio-extractor | 12/min | 520 credits, 4 Steel, 2 Circuits | 25/min | 1,500 credits, 15 Steel, 8 Circuits | 60/min |
| Energy Storage | 200 MJ | 450 credits, 6 Steel, 2 Circuits | 500 MJ | 1,300 credits, 20 Steel, 6 Circuits | 1,200 MJ |
Payback ranking (hours to recoup upgrade cost vs building two Mk 1s):
| Upgrade | Payback Time | Verdict |
|---|---|---|
| Mk 2 Smelter | 0.7 hr | Best first upgrade |
| Mk 2 Plasma Forge | 0.8 hr | Rush this |
| Mk 3 Bio-extractor | 1.2 hr | Sleeper hit |
| Mk 2 Refinery | 1.4 hr | Solid |
| Mk 2 Atomizer | 1.5 hr | Good if you use it |
| Mk 2 Fusion Reactor | 4.2 hr | Skip, build two Mk 1 |
| Mk 3 Smelter | 3.8 hr | Only if you have Titanium surplus |
Mk 2 Smelter and Plasma Forge – The Must-Builds
The Mk 2 Smelter is the single most impactful upgrade in v1.1. It doubles your basic metal output with the same power draw. I replaced two rows of Mk 1 Smelters with one row of Mk 2 and freed up roughly 8 tiles for other production. At Station Level 12, that space is prime real estate.
The Mk 2 Plasma Forge follows close behind because Superalloy is always the bottleneck in mid-game. One Mk 2 Forge running at full tilt produces 18 Superalloy/min, which is enough to sustain two Mk 2 Smelters, a Mk 2 Atomizer, and leave some for ship building.
For Superalloy chain planning, our Superalloy Guide has the full production tree with all the ratio calculations.
Mk 3 Bio-extractor – The Sleeper Hit Everyone Misses
Everyone focuses on Smelters and Forges, but the Mk 3 Bio-extractor is the best value in the lineup. It produces 60 biomass/min in the same footprint as a Mk 1 (12/min). That is a 5x multiplier.
Why this matters: Biomass is the feedstock for Nitrox processing, which feeds Oxygen production, which feeds every advanced recipe in the game. A single Mk 3 Bio-extractor with a Mk 2 Refinery feeding it can sustain a mid-game factory with zero oxygen bottlenecks. Before v1.1, I needed four Mk 1 Bio-extractors to do the same job.
Our Biomass and Organic Processing Guide covers the full chain from raw organics to finished advanced materials. With Mk 3 Bio-extractors, the whole chain compresses by roughly 60%.
Mk 2 Fusion Reactor – The Trap
The Mk 2 Fusion Reactor produces 22 MW compared to 10 MW from a Mk 1. Sounds good until you see the cost: 3,200 credits, 25 Superalloy, 15 Electronics. Two Mk 1 reactors cost about 1,600 credits total and produce 20 MW combined. The Mk 2 saves one tile of space, but at nearly 2x the per-MW cost.
I built one Mk 2 Fusion Reactor and regretted it. The 2 MW extra over two Mk 1s is not worth 25 Superalloy in the mid-game. Only build Mk 2 Fusion Reactors when you have maxed out your station space and literally cannot fit another reactor.
For power grid design, check our Multi-Source Power Grid Stability Guide for solar-fusion hybrid setups that save Superalloy for better uses.
Mk 3 Factory – When to Upgrade
Mk 3 becomes worth it around Station Level 16+ when you have:
- A steady supply of Titanium and Superalloy from multiple outposts
- At least 2 remote mining operations running
- Your main production lines are fully compressed
At this point, upgrading your Smelter and Plasma Forge to Mk 3 doubles output again. The Matter Printer Mk 3 is particularly effective here, jumping from 14/min to 30/min – essential for mass-producing station modules for the endgame Space Elevator push. Our Endgame Guide and Final Stretch covers the Space Elevator requirements in detail.
Mk 2/Mk 3 Research Tree
These blueprints are in the Production Tree tab, not the general research tab. Each upgrade requires:
- Mk 2: Station Level 10, previous Mk 1 blueprint completed
- Mk 3: Station Level 14, Mk 2 blueprint completed, Enhanced Manufacturing researched
Research costs scale: Mk 2 costs roughly 1,200 Tech Points, Mk 3 costs about 3,500 Tech Points. Plan your research order using our Research Order Guide.
Community Verification
Production numbers measured with stopwatch timing over 10-minute runs per building. Your results may vary based on station level and module upgrades. Verified against Steam patch notes for v1.1.0.3 (Mk 2/Mk 3 Factory fixes) and v1.1.1.0 (Mk readability improvements).
Official patch notes: Steam News announcement