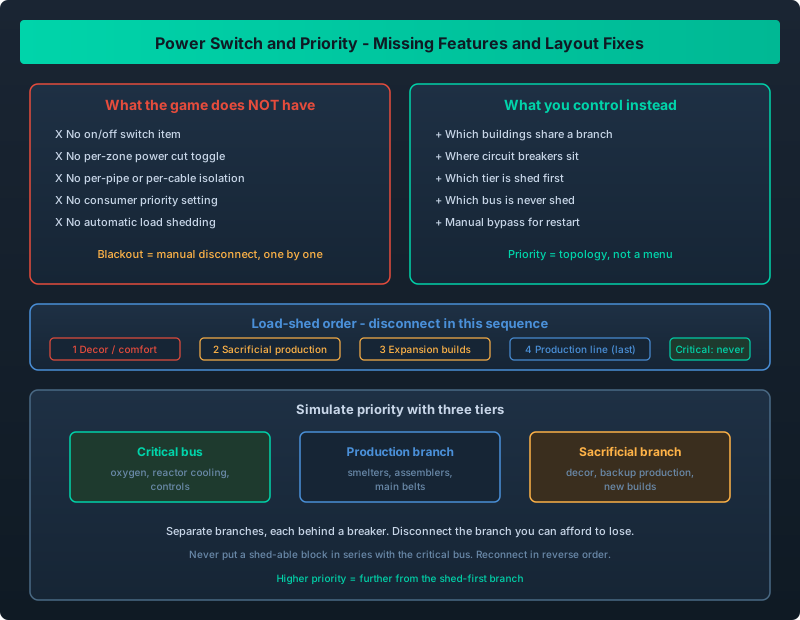
There is no switch item and no consumer priority; load shedding has to be built into the layout instead
The Blackout Problem Has No Button
When your grid tips over capacity, Outworld Station does not ask which buildings to sacrifice. It throttles everything, something dies, and the cascade starts. You would love to flip a switch, cut the expansion wing, and keep life support alive. There is no switch. There is no priority setting either - you cannot mark oxygen as important and the new Assembler as optional.
This guide covers the features that are genuinely missing and the layout discipline that replaces them. If you have not yet split your grid into zones with circuit breakers, read the Power Grid Zoning and Circuit Management guide first - that is the prerequisite. This picks up where zoning ends: switching, priority, and load shedding.
There is no on/off switch item, no per-zone cut, no per-pipe isolation, and no way to give one consumer priority over another. You simulate all of it with physical layout: keep sacrificial non-critical loads on their own breaker you can disconnect fast, keep a manual-bypass critical bus that never shares a branch with production, and shed load by physically disconnecting whole blocks one breaker at a time. Priority is a wiring decision, not a menu setting.
The Exact Features That Are Missing
Be clear-eyed about what the game does not have, because a lot of wasted forum posts come from assuming these exist in a menu:
| Feature players want | Present in game? | What you actually get |
|---|---|---|
| On/off switch item | No | Nothing to toggle; buildings run if powered |
| Per-zone power cut | No | Circuit breakers separate branches but do not “switch” them off |
| Per-pipe / per-cable isolation toggle | No | Cables and pipes are physical; you disconnect by deleting or rerouting |
| Consumer priority list | No | Every consumer on a branch draws equally |
| Automatic load shedding | No | Throttling is linear and hits everything on the affected branch |
| Per-branch manual isolation | Partly | A circuit breaker lets you physically break a branch to isolate it |
So the only real lever you own is which buildings share a branch. That is why this guide is about layout rather than settings.
Workaround 1: Manual Disconnect Discipline
The bluntest tool is the one everyone uses: when a blackout looms, walk the station and physically disconnect blocks you can live without. It only works if the layout makes disconnects cheap.
- Group non-critical loads onto as few branches as possible so a blackout is two or three disconnects, not twenty.
- Keep every disconnection point on a main walking route, not buried inside a machine stack.
- Decide which branches are “cut first,” “cut second,” and “never cut” before you need to.
A rat’s nest makes this agonizing; a station zoned with breakers at the boundaries makes it a thirty-second job.
Workaround 2: Build Sacrificial Non-Critical Loads On Purpose
This is the workaround almost nobody plans for, and it saves the most pain. Set aside a deliberate “sacrificial tier” - a branch of buildings you fully expect to lose during a brownout.
Good candidates include decorative or comfort loads, slow non-blocking production you can pause, storage builds still filling up, and anything whose stoppage does not stall a chain downstream.
Keeping these on one sacrificial branch means the branch you lose is one you chose in advance. It is the closest thing to a priority system the game offers. Pair it with buffer storage so a brief sacrifice does not starve the next stage.
Workaround 3: Load Shedding By Physically Disconnecting Blocks
Load shedding is the practice of dropping demand instead of adding supply. In Outworld Station you do it by hand, breaking branches one at a time until the grid is back under capacity.
A repeatable shed order, from cheapest loss to worst:
- Disconnect the decorative and comfort branch.
- Disconnect the sacrificial production branch.
- Disconnect the expansion builds that are not yet feeding a chain.
- Only then consider pausing a production line.
A circuit breaker used this way is a manual isolation point, not an automatic switch - you still walk over and break the branch. When you reconnect supply, restore in reverse order so a surge of motors does not instantly retrip the grid. Multi-source grids make this worse, and the Multi-Source Power Grid Stability guide covers why mixing sources changes how branches recover.
Workaround 4: Keep A Manual-Bypass Critical Bus
Your life support and reactor cooling must never share a branch with anything you might shed. Build a dedicated critical bus - oxygen, coolant pumps, the controls that keep the reactor sane - and wire it straight to a source you never disconnect.
The “manual bypass” part means you always keep a path to restart it:
- Give the critical bus its own source or its own dedicated branch off a stable source.
- Never route a shed-able production block in series with the critical bus, or you turn one disconnect into a station-killing mistake.
- Rehearse the recovery: if the critical bus does drop, you want the restart path to be one reconnect, not a hunt.
This is where power source selection matters: a steady source dedicated to life support is worth more than raw capacity when the grid is stressed.
On remote colonies, the cross-planet power limits constrain how far you can push that dedicated bus.
Workaround 5: Simulate Priority With Layout
Since you cannot assign priority numbers, encode priority in topology. Three tiers, three rules:
| Tier | What lives here | Wiring rule |
|---|---|---|
| Critical | Oxygen, reactor cooling, controls | Own branch, never shed, ideally own source |
| Production | Smelters, assemblers, main belts | Shares one or two branches you shed second |
| Sacrificial | Decor, backup production, new builds | One branch, shed first, expect to lose it |
The tier a building belongs to is decided by where you plug it in. Higher priority means further from the shed-first branch. Revisit the tiering whenever you expand, because a new build on the critical bus quietly demotes everything on it.
Outworld Station gives you no switch, no per-zone cut, and no priority setting, so stop waiting for them. Decide your tiers before you wire anything, put sacrificial loads on their own breaker, keep a manual-bypass critical bus that never shares a branch with production, and shed load by disconnecting blocks in a fixed order. The zoning work described in the prerequisite guide is the foundation; this article keeps the lights on for the buildings that matter when something has to give.