Your Remote Mine Is Wiped and You Did Not Even Get a Notification
You set up a planetary outpost on a titanium-rich moon. 12 drills, 4 smelters, 2 cargo ships running supply routes back to your main station. Profitable for hours. Then you check the map screen and the outpost icon is gone. No alert. No notification. Just a gray square on the galaxy map where your base used to be.
Asteroid strikes and pirate raids do not discriminate between your main station and remote outposts. On a planet surface, there is no shield dome covering everything. Your buildings are exposed, spread out, and defenseless unless you place them inside a protected perimeter.
The Short Version
Every remote outpost needs three layers: a perimeter wall, automated defense turrets at each corner, and a repair grid with spare parts. Wall everything off into a single compound. Place turrets at 120-degree coverage angles. Keep 200 repair modules in a dedicated storage connected to the repair system. Without these, expect to rebuild every 2-4 hours.
What Your Remote Outpost Is Up Against▼/span>
Types of Outpost Attacks
| Threat | Frequency | Damage | Targets | First Warning |
|---|---|---|---|---|
| Asteroid Strikes | Every 15-30 min | High | Random buildings | Sound effect + screen shake |
| Pirate Raids | Every 2-4 hours | Very High | Docks, storage, drills | “Hostile ships detected” message |
| Meteor Shower | Every 1-2 hours | Moderate | Exposed buildings chain damage | Visual: fire streaks in sky |
| Surface Quakes | Rare | Low | Foundation stability | Mining drill status warning |
Why Remote Outposts Are More Vulnerable
Your main station has built-in armor, shield generators, and repair nanobots. Planetary outposts have none of these by default. Every building you place on a planet surface starts at 100% HP and only loses it. No passive regeneration. No shield. A single asteroid strike on your power line can cascade into a full outpost failure because the repair system loses power and cannot fix the next hit.
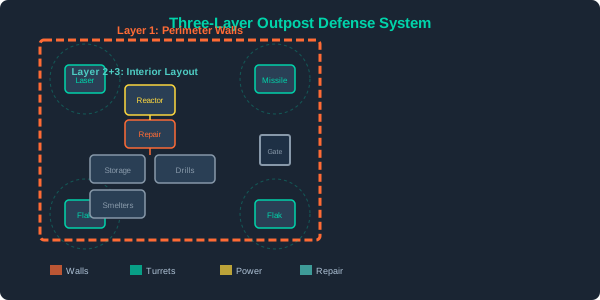
Three-layer outpost defense: Perimeter wall stops threats, Turret grid eliminates attackers, Repair system fixes damage before cascading failures occur
Building the Three-Layer Defense System▼/span>
Layer 1: Perimeter Walls
| Wall Type | HP | Cost | Best For |
|---|---|---|---|
| Reinforced Wall | 2500 | 10 Superalloy + 5 Steel | Main outer perimeter |
| Mesh Wall | 800 | 5 Steel | Interior dividers, quick sections |
| Foundation Wall | 5000 | 30 Superalloy + 10 Tungsten | High-threat zones (reactors, storage) |
Placement rules:
- Minimum 3-tile gap between walls and buildings
- Single gate entry point, not multiple
- Corner towers built into wall structure for turret mounts
- Double-layer foundation walls around power generation
Layer 2: Turret Grid
| Turret Type | Range | Damage | Ammo | Count per Outpost |
|---|---|---|---|---|
| Laser Turret | 15 tiles | Low continuous | Power | 4 (2 on each long wall) |
| Missile Turret | 22 tiles | High burst | Missiles | 2 (on entry gate) |
| Flak Turret | 12 tiles | Medium AoE | Shells | 2 (near storage) |
Turret coverage rule: Place turrets so their range circles overlap by at least 50%. A single turret can be destroyed. Overlapping fields of fire ensure no gap opens up.
Layer 3: Automated Repair Grid
- Place a Repair Station within 10 tiles of the outpost center
- Connect to a dedicated storage container holding 200 Repair Modules
- Set repair priority to “continuous” (repairs as damage occurs, not after attack ends)
- Power the Repair Station on its own sub-grid with a backup battery
The Repair Stock Trap
50 Repair Modules might seem like enough. An asteroid strike damages 3-5 buildings at once. Each takes 10-15 modules to repair. Run out mid-repair and the partially-repaired building takes double damage from the next hit. Keep at least 200 modules per outpost, ideally 500 for high-threat zones.
Outpost Layout Template
  [Turret]                  [Turret]
      +-----+------------+-----+
      |     |  Power      |     |
      |     |  Reactor    |     |
      |  D  +-----+------+  D  |
      |  r  |     |      |  r  |
      |  i  | Store  Repair|  i  |
      |  l  |     |      |  l  |
      |  l  +-----+------+  l  |
      |     |  Smelter     |     |
      |  s  +-----+------+  s  |
      [Gate/Entry Dock]
  [Turret]                  [Turret]
Place power in the center, surrounded by storage and repair. Smelters and drills on the outer ring inside the walls. Turrets cover the 4 corners. Single gate for entry and drone access.
Material Budget for a Fully Defended Outpost
| Material | Quantity | Used For |
|---|---|---|
| Superalloy | 200 | Walls + turret frames |
| Steel | 300 | Mesh walls + turret shells |
| Electronics | 80 | Turret control units |
| Repair Modules | 500 | Automated repair system stock |
| Missiles | 200 | Turret ammo reserve |
| Power Cells | 100 | Backup battery for repair grid |