Your Research Lab Is Idle and You Have No Idea Why
You built the Research Lab. You fed it some components. It produced Tech Points for a while. Then it stopped. The Lab says “Waiting for components.” You check your storage and see full bins of Electronics, Superalloy, and Circuits. So why is the lab idle?
The answer is almost never “not enough components.” It is “wrong components at the wrong time” or “Tech Point recipe requires items your production line does not make yet.”
Tech Points are the gate that controls your entire progression. If you run out, you cannot research better miners, better power, or better weapons. Every hour you spend without Tech Points is an hour where your station could have been growing.
The Short Version
Tech Points come from Research Labs that consume specific component chains. Build 2-3 labs in parallel, feed them different recipes, and prioritize the Tech Point Efficiency research first. One lab running constantly generates more points than three labs running intermittently.
How Tech Points Are Generated (The Recipe System)▼/span>
The Research Lab Interface
Each Research Lab has a single slot for a “Research Component.” Insert a component and the lab consumes it over time, generating Tech Points. Different components yield different point rates.
| Component | Points per Item | Consume Time | Points per Minute | Component Cost |
|---|---|---|---|---|
| Data Chip | 5 | 30s | 10 | 2 Silicon + 1 Copper |
| Research Module | 25 | 120s | 12.5 | 4 Electronics + 2 Circuits |
| Advanced Core | 100 | 300s | 20 | 8 Superalloy + 4 Electronics |
| Quantum Crystal | 500 | 600s | 50 | 16 Advanced Mat + 8 Nuclear Cells |
Why Your Lab Stops
The most common reason a lab stops: you ran out of the specific component it was consuming. Your assembler that makes Research Modules might be starved for Circuits because your Circuit assembler is starved for Copper. Trace the chain back and you will find the real bottleneck.
Lab Setup Rule
Never feed a Research Lab from the same buffer that feeds your production lines. Dedicate one assembler per lab. If you share buffers, production spikes will starve your lab and you will not notice until research stops.
Five Tech Point Farming Methods Ranked▼/span>
Method 1: Dedicated Lab Chain (Best for Mid-Game)
Build 2 Research Labs, each fed by its own dedicated assembler chain. Lab 1 runs Research Modules. Lab 2 runs Advanced Cores.
Pros: Steady output, no production conflicts Cons: Takes space, costs components Rate: ~32.5 points/min with both labs running
Method 2: Overflow Feeding (Best for Resource-Rich)
Route overflow components from your main production into a single lab. When production exceeds consumption, the excess feeds research.
Pros: Zero dedicated infrastructure, uses spare capacity Cons: Stops when production lines are at capacity Rate: Variable, 5-20 points/min depending on surplus
Method 3: Research Lab Cluster (Best for Late-Game)
Build 4+ labs, each with dedicated assemblers and buffer storage. Cycle different component types so you never run out of all of them at once.
Pros: Highest throughput, fault tolerant Cons: Expensive, requires significant component production Rate: 60-100+ points/min
Method 4: Manual Component Crafting (Emergency Only)
Hand-craft Advanced Cores or Quantum Crystals at the Matter Printer when you are a few points short of an essential unlock.
Pros: Instant, no setup required Cons: Burns manual materials, not sustainable Rate: Burst only
Method 5: Scavenging (Early Game Only)
Salvage components from wrecks and deconstructed buildings to feed a single lab. Useful only in the first 2 hours.
Pros: Uses materials you already have Cons: Limited supply, runs out fast Rate: 5-10 points/min
Ranking
| Method | Sustained Rate | Setup Cost | Maintenance | Best For |
|---|---|---|---|---|
| Dedicated Lab Chain | High | Medium | Low | Station Level 6-12 |
| Overflow Feeding | Low | None | None | Resource-rich mid-game |
| Lab Cluster | Very High | High | Medium | Station Level 12+ |
| Manual Crafting | Burst | None | High | Emergency only |
| Scavenging | Very Low | None | None | First 2 hours |
The Tech Point Efficiency Research Trap
The Tech Point Efficiency research sounds amazing: “+20% Tech Point generation per level.” What the game does not tell you: it increases the point cost of ALL future researches by 10%.
This means you need to calculate the break-even point.
| Efficiency Level | Point Boost | Cost Increase | Break-Even (researches needed) |
|---|---|---|---|
| 1 | +20% | +10% | 1 research after upgrade |
| 2 | +40% | +20% | 2 researches after upgrade |
| 3 | +60% | +30% | 3 researches after upgrade |
Verdict: Efficiency Level 1 is almost always worth it. Level 2 if you plan 4+ more researches. Level 3+ only for very long games.
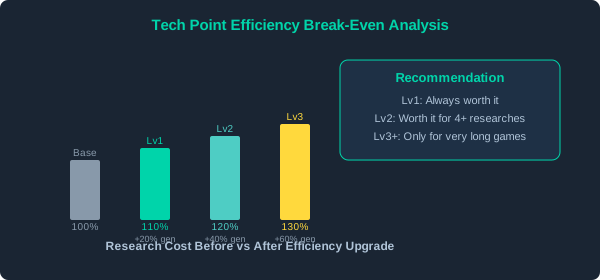
Tech Point Efficiency research break-even analysis showing the point at which the boost outpaces the cost increase
What to Research First (Priority Order)
For a detailed research tree walkthrough, see our Research Order Guide. But for Tech Point specific priorities:
- Tech Point Efficiency I - Makes every future research faster
- Advanced Lab Operation - Labs produce 25% faster
- Component Optimization - Research components cost 15% fewer materials
- Parallel Research - Labs can work on different techs simultaneously
- Quantum Computing - Unlocks Quantum Crystal recipes for best points/min