Your Turrets Fire at Empty Space While Raiders Wreck Your Drill
You built 4 Missile Turrets around your station. A raid warning flashes. The turrets spin up, fire a volley, and… miss. The raiders fly right through your defense gap and shred your Drone Bay while your turrets are reloading.
Turret placement in Outworld Station is not about surrounding your station. It is about overlapping fire zones, covering approach vectors, and matching weapon type to enemy type. A single well-placed turret pair is worth 6 randomly-placed ones.
The Short Version
Place turrets in overlapping pairs 30 tiles apart. Use Missile Turrets for long range (40 tiles), Laser Turrets for mid-range (25 tiles), and Point Defense for close range (10 tiles). Each pair should cover exactly one approach vector. Three pairs cover a small station completely. Upgrade targeting range before damage.
Weapon Types Ranked[+]
Turret Comparison
| Turret | Range | DPS | Ammo Cost | Best Against | Weak Against |
|---|---|---|---|---|---|
| Missile Turret | 40 tiles | 50 | 5 Iron/missile | Slow bombers, capital ships | Fast fighters (missiles miss) |
| Laser Turret | 25 tiles | 35 | Power only (20kW) | All enemy types, no ammo | Sustained fire (overheats) |
| Railgun Turret | 50 tiles | 80 | 10 Tungsten/shot | Capital ships, structures | Short-range enemies |
| Point Defense | 10 tiles | 60 | Power (10kW) | Missiles, fighters | Heavy armor |
| Flak Cannon | 20 tiles | 40 | 5 Copper/shell | Swarms, groups of small enemies | Single large target |
Best Turret Loadout by Station Level:
| Station Level | Recommended Loadout | Total Turrets |
|---|---|---|
| 1-3 | 2 Laser Turrets | 2 |
| 4-6 | 2 Missile + 2 Laser | 4 |
| 7-9 | 2 Missile + 2 Laser + 2 Point Defense | 6 |
| 10+ | 4 Missile + 4 Laser + 2 Railgun + 2 Flak | 12 |
Overlapping Fire Zones - The Geometry[+]
How to Cover Your Station
The Triangle Method:
Place turrets at the three corners of an equilateral triangle centered on your station core. Each turret covers a 120-degree arc. The overlap at the center ensures no enemy reaches the core without passing through at least two fire zones.
          [Missile A]
          /    |    \
         /     |     \
[Laser B]------CORE------[Laser C]
         \     |     /
          \    |    /
          [Missile D]
Spacing Rules:
- Missile turrets: 40 tiles apart (their max range touches at overlap)
- Laser turrets: 25 tiles apart (their max range)
- Mixed pairs: Missile + Laser placed 30 tiles apart
Approach Vectors to Cover:
- From the asteroid belt (most common raid direction)
- From open space (second most common)
- From above/below (vertical approach, rare but deadly)
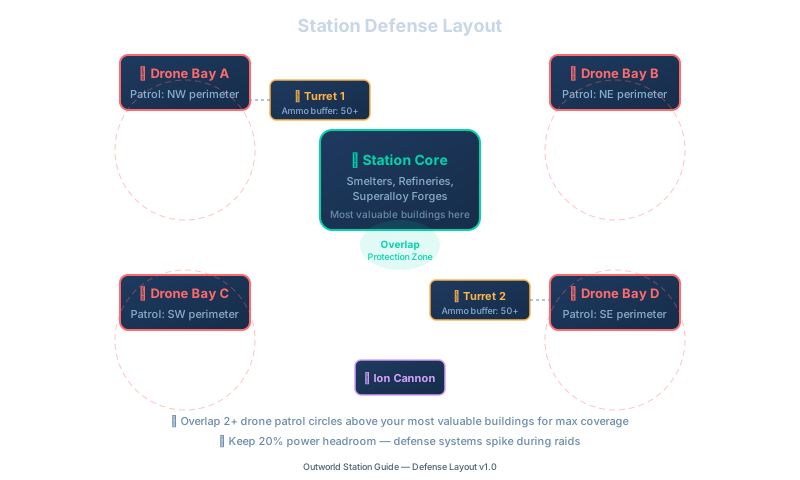
Triangle defense pattern: Missile turrets at long range cover approach vectors, Laser turrets at mid-range catch leakers, Point Defense cleans up anything that gets through.
Enemy Types and Counter Strategy[+]
Know Your Enemy
| Enemy | Speed | Armor | Weakness | Recommended Counter |
|---|---|---|---|---|
| Fighter Drone | Fast | Light | Laser (no ammo issues, fast tracking) | 2 Laser Turrets |
| Bomber Drone | Slow | Medium | Missile (high damage per hit) | 2 Missile Turrets |
| Capital Raider | Slow | Heavy | Railgun (armor-piercing) | 2 Railgun + sustained fire |
| Swarm | Very Fast | Very Light | Flak / Point Defense | 2 Flak or Point Defense |
| Assassin Drone | Very Fast | Medium | Point Defense (short range tracking) | 4 Point Defense in crossfire |
Pre-Raid Checklist
- Are your turrets loaded? (Missiles need ammo in adjacent storage)
- Are your turrets powered? (Each Laser needs 20kW, each Missile needs 10kW)
- Are repair drones assigned to defense zones?
- Do you have a backup power supply for the defense grid?
- Are your approach vectors clear? (No buildings blocking line of sight)
v1.1: Defense Considerations
Two v1.1 changes affect how you run your defense grid:
v1.1 (a) Wreck salvage from combat: Destroyed ships – including your own downed ships – now drop recoverable items. If a raider or one of your ships goes down near the station, salvage it instead of leaving it as debris. Factor this into turret placement: keep at least one firing lane clear so a Salvage ship or drone can reach a fresh wreck without eating fire. See Salvage and Wreck Harvesting Guide for the new ship-drop loot source.
v1.1 (b) CPU-controlled ships: With v1.1 you can assign CPU-controlled ships to escort/patrol roles. These autonomous ships move on their own, so turret targeting and fire-zone assignments must account for friendly ships in the kill zone. Route CPU escorts outside your turret overlap arcs to avoid friendly-fire locks, and reserve one approach vector for the escort’s patrol lane.